Finding oil under an oil-immersed transformer is never good news, but it is not always an emergency either. What matters most is how you respond in the first hour. This guide explains what causes transformer leakage, how to judge how serious it is, which safety steps to take before anything else, and when a leak can be handled on site versus when you must shut the unit down and call in a specialist. If you are responsible for transformers in a plant, facility, or substation, this is the practical checklist you need to keep a small seep from turning into a failed winding.
Why Do Transformers Leak Oil?
Transformer oil leaks almost never come from a single dramatic cause. In field practice, most leaks trace back to one of four root problems: seal failure, weld defects, improper assembly, or environmental wear. Understanding the cause matters because the repair method is completely different for each one.
Seal and gasket aging
The most common source of transformer leakage by far is a failed gasket. An oil-filled transformer has dozens of sealed joints: the tank cover, flanges, bushing turrets, radiator connections, the conservator, and the gas relay. The rubber gaskets at these joints are constantly exposed to heat, oil chemistry, and mechanical pressure. Over years of thermal cycling they harden, crack, or lose their compression set, and oil begins to weep past them. Gaskets typically show problems first after five to ten years of service, which is why older units leak more often than new ones.
Weld and tank defects
The tank itself is a welded structure, and small pinholes or incomplete fusion can hide under paint and primer at the factory. Electromagnetic vibration, oil pressure, and temperature expansion slowly open these weak points over time. Leaks at the lower part of the tank are especially common because that area carries the highest static oil pressure.
Improper assembly and maintenance work
A surprising share of transformer oil leaks are man-made. When a cover or flange is reinstalled after maintenance, gaskets can be misaligned or contaminated, and bolts are often tightened unevenly. One-sided tightening tilts the flange and creates a leak channel even with a brand-new gasket. This is why torque procedures exist: bolts must be tightened symmetrically, in a star or cross pattern, to a specified torque value.
Environmental and operating stress
Outdoor transformers in harsh environments leak sooner. Sand and dust grind against seals, salt spray corrodes welds, and large day-to-night temperature swings make the tank expand and contract, working every joint. Units in coastal areas, desert sites, or high-vibration locations need shorter inspection intervals than clean indoor units.
How Serious Is a Transformer Oil Leak?
Not every leak demands an immediate shutdown, but every leak demands an immediate assessment. The practical way to classify a leak is by its rate, because the rate tells you how much time you have. Use the table below as a field reference.
| Leak type |
Visual signature |
Risk level |
Recommended action |
| Seepage |
Damp or stained surface, no drops forming |
منخفضة إلى متوسطة |
Record it, monitor oil level weekly, plan repair at next scheduled outage |
| Slow drip |
One or more drops per minute |
معتدل |
Contain the spill, check level daily, schedule repair within weeks |
| Fast drip or stream |
Continuous flow or spray |
عالية |
De-energize if safe, isolate, contain, call the manufacturer or a specialist immediately |
Why is even a slow transformer oil leak worth acting on? The oil does two jobs: it insulates the windings and it carries heat away. Every liter lost reduces both cooling capacity and dielectric strength. Worse, a falling oil level exposes the top of the winding and lets moist air in. Moisture in transformer oil is the leading contributor to insulation breakdown and, eventually, a catastrophic short circuit. There are also secondary risks that operators often forget: oil on concrete is a slip hazard, oil near cables or switchgear is a fire hazard, and any release to drains or soil is an environmental compliance issue that can carry heavy fines.
Transformer Oil Leak? What to Do First
When you discover a leak, resist the urge to grab a wrench and tighten every bolt you can see. Blind retightening can extrude a gasket, strip threads, or distort a flange, and it can turn a manageable drip into a bigger problem. Follow this sequence instead.
Step 1: Assess the rate and the location
Note the leak rate, where it is on the unit, the oil level on the gauge, and whether any alarm is active. If the level is dropping fast, oil is spraying, or the leak is near energized terminals, treat it as an emergency.
Step 2: Isolate and de-energize when required
For fast leaks, high-voltage exposure, or any risk of internal damage, take the transformer out of service using the owner’s isolation procedure. Do not enter energized clearances to inspect or wipe a leak. Never perform hot work on an oil-filled transformer.
Step 3: Contain the spill
Deploy drip pans, absorbent pads, or a containment berm under the leak before you do anything else. Stop the oil from reaching drains, soil, or cable trenches. Environmental containment is not optional; it protects you from both safety and regulatory problems.
Step 4: Record and report
Photograph the leak, note the date, oil level, temperature, and load, and log it in your maintenance system. Clear records let you trend whether a small seep is getting worse, and they give a repair technician the exact history they need.
Keep in mind that even a “minor” oil leak on an energized unit needs a defined owner and a follow-up date. A seep that nobody owns is how transformer failures start.
How to Find the Source of the Leak
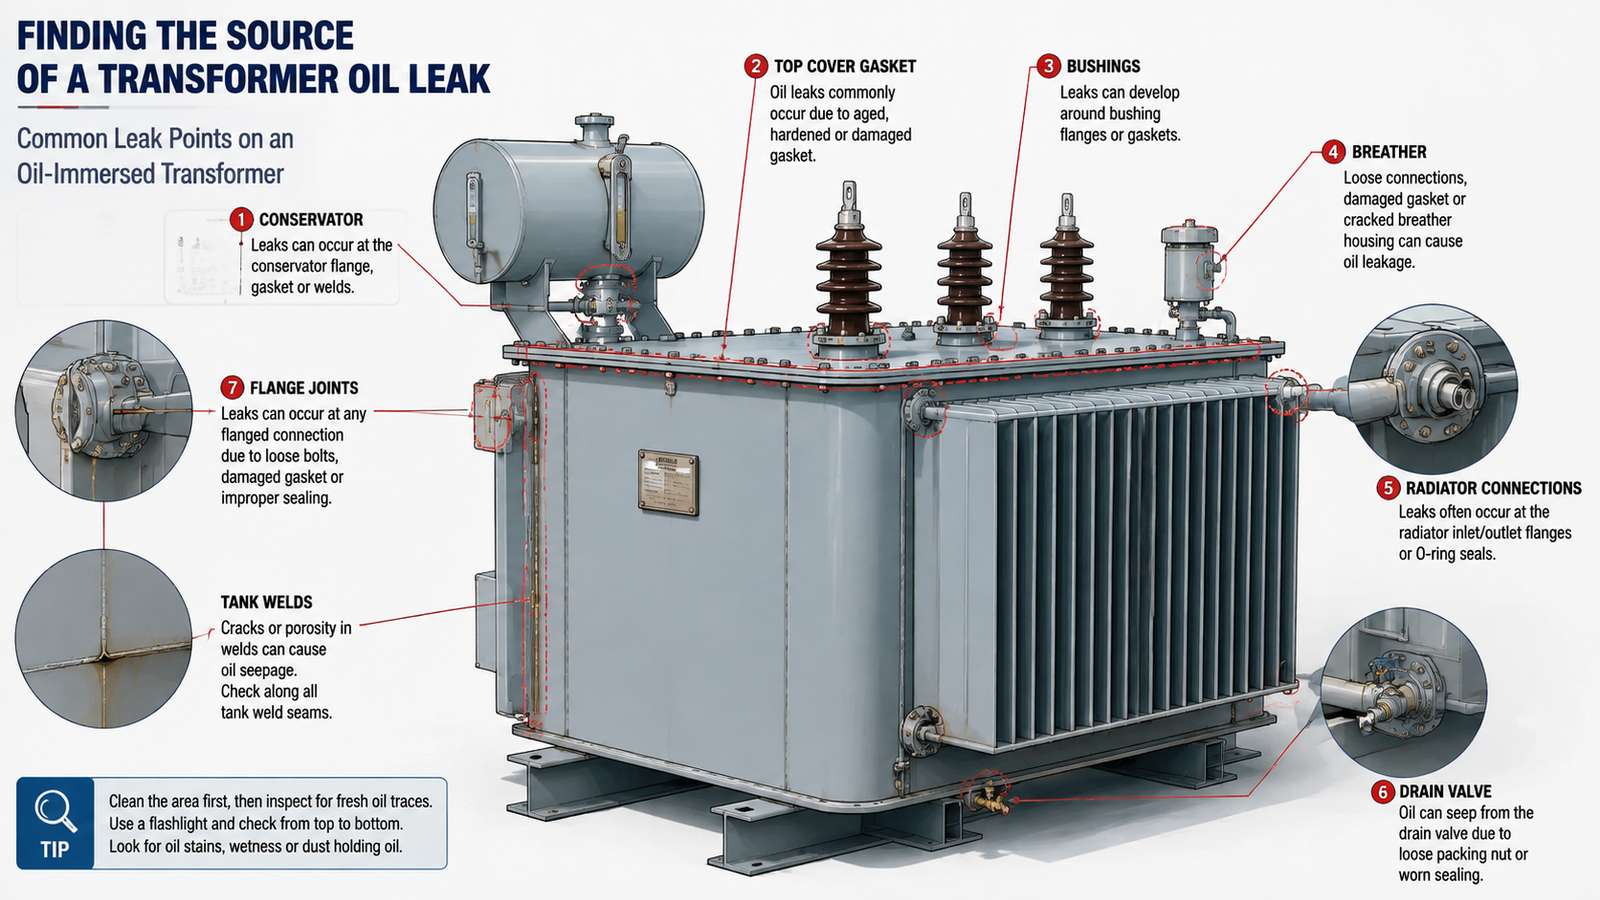
Here is the trap: oil runs downhill along tank surfaces, so the drip you can see on the floor is usually not the actual defect. A leak at the top cover gasket can travel down the tank wall and drip from a bottom weld that is perfectly sound. Finding the true source saves you from repairing the wrong spot.
Work from the top of the unit downward, looking for the highest fresh wet point:
- Conservator and breather — check the oil level indicator, breather connections, and the bladder condition; a failed bladder causes false level readings and hidden leakage.
- Bushings and turrets — inspect oil-to-air seals, mounting flanges, and tap connections; use a mirror and flashlight for undersides.
- Top cover and gaskets — the cover gasket is a prime suspect, especially after any recent maintenance.
- Radiators and cooling fittings — look at header connections, butterfly valve flanges, and fan mounting areas.
- Tank body and welds — examine weld seams, nameplate attachments, and lifting lugs; check for corrosion, especially near the base.
- Valves and accessories — drain valves, sample valves, pressure relief devices, and the gas relay connection are all common leak points.
If the source is not visible, clean the suspected area thoroughly, then watch for the highest point where fresh oil reappears. For slow internal leaks, a UV fluorescent dye added to the oil will migrate to the leak path and glow under a UV lamp after a day or two of operation, which is the most reliable way to pinpoint a small seep without draining the tank.
Temporary Fix or Permanent Repair?
Once you know the source, the repair method depends on the component and whether you can take an outage. In practice, oil leak repair falls into three categories.
Gasket and flange leaks: replace, do not patch
For a leaking gasket, the correct fix is replacement: drain or lower the oil below the joint when needed, remove the old gasket completely, clean both flange faces, install an oil-resistant gasket of the correct material and size, and torque the bolts symmetrically in a star pattern to the manufacturer’s specification. If a flange face is corroded or warped, the component must be repaired or replaced; no gasket will seal a damaged surface for long.
Weld and tank leaks: welding is a specialist job
Weld leaks require qualified welding with the transformer de-energized and the oil level lowered below the weld line. This is not a maintenance-crew task: it needs a hot work permit, fire watch, a welder qualified for the tank material, and vacuum or pressure testing after the repair. Attempting to weld an oil-soaked, energized tank is extremely dangerous.
Temporary containment for live units
When an immediate shutdown is impossible, engineered temporary measures can buy time: epoxy putty for small pinholes, self-fusing silicone tape under a stainless clamp for small cracks, or an injection sealant for weeping gaskets. These are explicitly temporary. Each one must have an expiry date, an inspection frequency, and a scheduled permanent repair behind it. Never use a temporary patch as the final answer, and never let a temporary clamp obstruct cooling fins, valves, or nameplates.
| Situation |
First response |
Permanent fix |
| Aging gasket, small weep |
Monitor level; contain |
Replace gasket, re-torque to spec |
| Loose flange after maintenance |
Torque check only if procedure known |
Re-torque in star pattern; replace gasket if damaged |
| Pinhole or crack in tank |
Epoxy putty or clamp as temporary control |
Drain, qualified weld, pressure test |
| Fast leak or spray |
De-energize, isolate, contain |
Manufacturer or specialist evaluation |
When Should You Call a Professional?
Some transformer maintenance work is well within a competent site team’s scope: monitoring, containment, inspection, and gasket replacement on a properly isolated unit. Call in the manufacturer or a specialist transformer service company when any of the following is true:
- The leak rate is fast enough that the oil level drops noticeably within hours.
- The leak is on a weld, the tank body, or a bushing, where welding or compound sealing is required.
- The transformer is a high-voltage, large-capacity, or critical unit where an error is unacceptable.
- Oil level alarms, gas relay trips, or unusual sounds suggest internal damage in addition to the leak.
- You need oil testing, vacuum oil filling, or a full internal inspection before returning the unit to service.
If you are evaluating a replacement transformer rather than a repair, working directly with an experienced manufacturer gives you a single accountable partner for the whole equipment lifecycle, from specification to commissioning. A specialist can help you compare transformer options and our STU 100VA-5000VA control transformers, verify oil system design, and confirm the maintenance schedule that fits your application.
How to Prevent Transformer Oil Leakage
Every repair is more expensive than the inspection that would have caught the problem earlier. A realistic prevention program for oil-immersed transformers has three layers.
Routine visual inspections
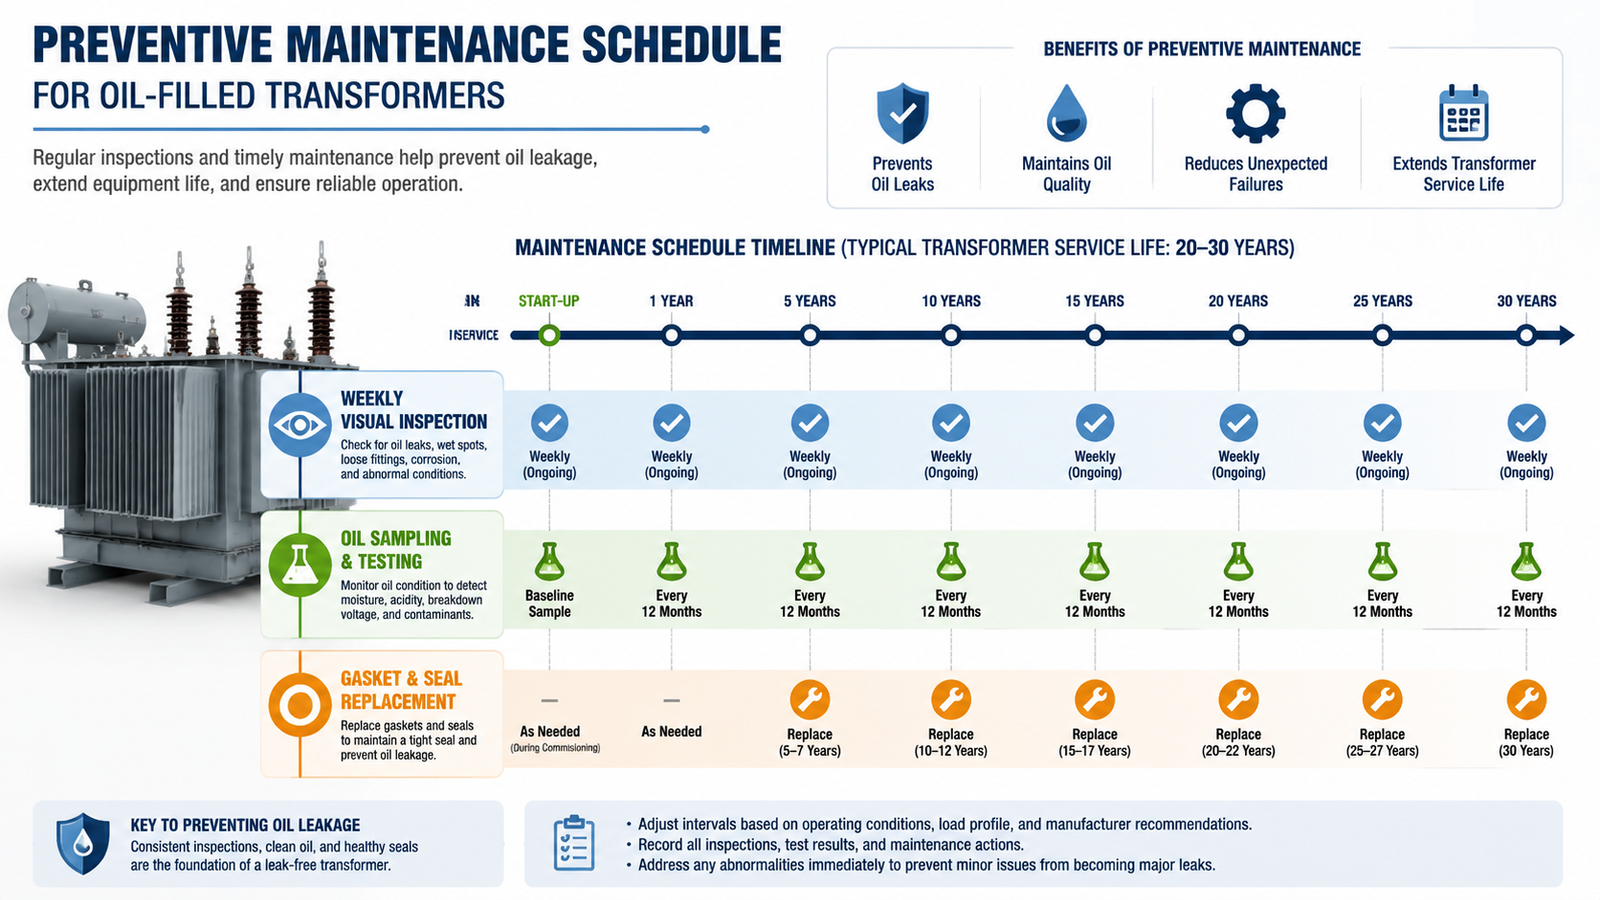
Walk the unit weekly. Look for fresh stains, drips on the pad, and oil on radiator fins, and check the oil level gauge against the temperature-corrected level. The same visual check takes five minutes and is the single most effective early warning you have.
Oil quality testing
Transformer oil does not fail suddenly; it degrades. Annual or semi-annual oil sampling that measures moisture content, dielectric strength, and acid value will show you seal or breather problems months before oil actually appears on the floor. Rising moisture in the oil is one of the earliest indicators of a developing leak or a failed breather.
Lifecycle seal management
Treat gaskets and the conservator bladder as consumable parts with a defined life, typically in the five-to-ten-year range depending on environment. Replacing critical seals on a schedule, rather than when they fail, eliminates most of the leaks this article describes. Keep the tank coating in good condition and address corrosion promptly, because corrosion is what turns a sound weld into a future leak site.
For buyers specifying new equipment, it is worth asking how the manufacturer tests tanks and welds before dispatch and what seal materials are used as standard. If your transformer is humming or tripping intermittently alongside oil loss, see our low voltage transformer noise diagnostic guide before scheduling a teardown. Those two answers tell you a lot about how often the unit will need oil leak repair over its working life.
Conclusion
Transformer oil leakage is one of the most common, and most preventable, problems in oil-immersed transformer maintenance. The correct response is always the same shape: assess the rate first, contain the oil, find the true source rather than the visible drip, and then choose between a controlled on-site repair and a specialist intervention. Slow leaks get scheduled; fast leaks get isolated. And the best fix of all is prevention, because regular inspection, oil testing, and scheduled seal replacement stop most transformer leakage before it ever starts. When a unit does need replacing, buying from a manufacturer that stands behind its tank quality and seal specification is the most reliable way to keep your transformer maintenance costs low for decades.
الأسئلة الشائعة
Can a leaking transformer continue operating?
Only after a risk assessment. A slow seep with a stable oil level and no alarms can usually operate under close monitoring until a scheduled repair. A fast leak, falling level, or any sign of internal damage requires de-energizing the unit.
Is transformer oil leakage dangerous?
Yes, for three reasons: lost oil reduces insulation and cooling and can lead to winding failure; oil near electrical equipment is a fire hazard; and oil that reaches drains or soil creates environmental and regulatory liability.
Can I just tighten the bolts to stop a transformer leak?
Not blindly. Bolts should only be re-tightened to the manufacturer’s torque specification, in a star or cross pattern. Uneven or excessive tightening can damage the gasket, distort the flange, and make the leak worse.
How often should transformer oil be tested?
Most operators test oil annually, or semi-annually for critical units and transformers in harsh environments. Testing moisture, dielectric strength, and acid value catches seal and breather problems before they become visible leaks.
What is the most common cause of transformer oil leaks?
Aged or failed gaskets at flanges, the tank cover, bushings, and radiator connections. Seal aging is responsible for the majority of field leaks, which is why scheduled gasket replacement is the highest-value preventive measure.
How long can an oil-immersed transformer run after a leak is sealed?
If the repair is done correctly and oil quality is verified afterward, the unit can return to full normal service. The key is confirming the oil level, checking for residual leakage, and testing the oil after the repair before restoring load.